Want to save time and grow your YouTube channel faster? By 2026, automation tools handle up to 90% of video production tasks, letting creators focus on growth instead of repetitive work. From scripting to uploading, AI and no-code platforms like ChatGPT, Fliki, and Zapier streamline workflows, enabling daily uploads without burnout.
Here’s what you’ll learn:
- How automation can cut production time by 96 hours/month and build passive income with AI workflows.
- The best tools for scripting, voiceovers, editing, and scheduling.
- Step-by-step setup for YouTube API and no-code workflows.
- Strategies to comply with YouTube’s stricter 2025/2026 quality policies.
Key takeaway: Automation isn’t about replacing creativity – it’s about making room for it. With the right system, you can post consistently, scale efficiently, and stay ahead of the competition.
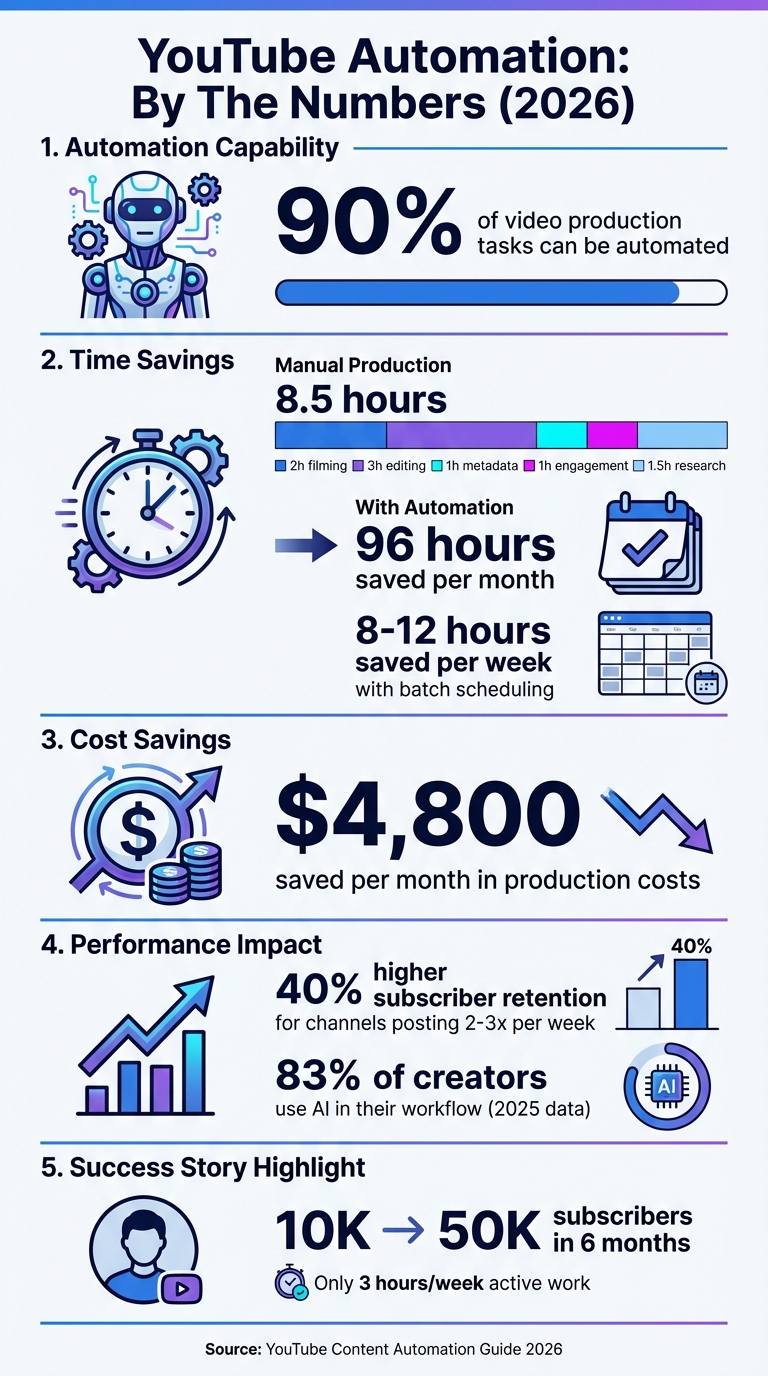
YouTube Automation Time and Cost Savings Statistics 2026
YouTube Content Automation Basics
What YouTube Content Automation Means
YouTube content automation involves using tools, software, and streamlined processes to handle repetitive tasks like video creation, editing, metadata setup, and publishing. Instead of manually uploading videos and entering metadata, you can integrate a content database – like Google Sheets – with YouTube through no-code platforms such as Zapier or Make.com. This setup allows videos to be automatically uploaded and scheduled once they’re ready.
With the help of YouTube Data API v3, automation tools can set metadata and transform raw materials – like text prompts, blog posts, or longer videos – into polished content. This can include full-length videos, Shorts with voiceovers, and captions. Automation makes it possible to produce and publish videos on a large scale and on a consistent schedule. Understanding these systems is key for creators looking to grow their channels efficiently.
Why Automate Your YouTube Content
Beyond the technical perks, automation is a huge time-saver. Producing a single video manually can take around 8.5 hours. This includes 2 hours for filming, 3 hours for editing, 1 hour for setting metadata, 1 hour for engagement, and 1.5 hours for research and scheduling. By automating these steps, creators can save over 96 hours of effort per month and cut production costs by roughly $4,800.
Consistency is another major factor. Channels that post 2–3 times per week see a 40% higher subscriber retention rate than those with irregular uploads. Automation tools like batch scheduling can help maintain this regularity while saving creators 8 to 12 hours each week. This extra time can be used for brainstorming, engaging with the community, or refining long-term strategies.
How AI and No-Code Tools Enable Automation
No-code platforms seamlessly connect AI tools into a fully automated production pipeline. For example, adding a row to a Google Sheet could trigger a series of actions: generating a script with ChatGPT, creating a voiceover using ElevenLabs, rendering the video via Fliki, and uploading it directly to YouTube – all without any manual steps.
These platforms offer pre-built integrations that are easy to use, making them a favorite among creators. Many successful channels in 2026 rely on a hybrid workflow, where AI handles repetitive tasks like captioning and scheduling, while creators focus on crucial decisions like choosing the right niche, ensuring quality, and setting the overall direction. This approach not only boosts efficiency but also aligns with YouTube’s updated authenticity standards, ensuring a balance between speed and quality.
Getting Started with YouTube Automation
Tools and Platforms You’ll Need
To kick off your YouTube automation journey, you’ll need four essential components.
First, there’s the YouTube Data API v3, which acts as the link between your automation tools and your channel. This API manages tasks like uploading videos and setting details such as titles, tags, and descriptions.
Next, you’ll need a no-code orchestration platform to tie everything together. Tools like Your Automated Life make this process seamless by enabling you to connect various apps and set up workflows without writing a single line of code. This becomes the central hub for your automation.
For organizing your content, Google Sheets or Airtable works well as a database to store video metadata and track project progress.
Finally, assemble your AI tools. These might include ChatGPT (or OpenAI) for scriptwriting, ElevenLabs for creating voiceovers, and video rendering software like Fliki, Revid.ai, or JSON2Video to transform scripts into polished videos. To boost channel growth, add tools like TubeBuddy or VidIQ for keyword research and optimizing metadata.
Here’s a quick look at these tools:
| Tool Category | Recommended Platform | Primary Function |
|---|---|---|
| Orchestration | Your Automated Life | Connects apps and automates workflows |
| Database | Google Sheets, Airtable | Stores video data and logs |
| AI Scripting | ChatGPT (OpenAI), Claude | Writes scripts and engaging hooks |
| AI Video Gen | Fliki, Revid.ai, JSON2Video | Creates fully edited videos from scripts |
| AI Voice | ElevenLabs, Azure Voice | Generates realistic voiceovers |
| SEO/Growth | TubeBuddy, VidIQ, Vista Social | Assists with keyword research and analytics |
Once you’ve gathered these tools, you’re ready to set up your API access.
Setting Up YouTube API Access
Start by creating a new project in the Google Developers Console and enabling the YouTube Data API v3. After that, set up OAuth consent and generate a Client ID and Client Secret. These credentials allow your automation platform to interact with your channel without requiring you to log in manually. Be sure to specify the permissions scope, such as https://www.googleapis.com/auth/youtube.upload, to control what actions the automation can perform.
Keep in mind that YouTube offers a free daily quota of 10,000 units. For example, uploading a video uses 100 units, while simpler tasks like reading data only consume 1 unit. If you plan to handle large volumes, you can request a quota increase. To keep everything secure, store your API credentials safely within your automation platform to prevent unauthorized access.
Connecting No-Code Platforms to YouTube
With your API configured, it’s time to link your no-code platform to YouTube. Using Your Automated Life, add a YouTube node and input your Client ID and Client Secret through OAuth authentication.
Once connected, set up triggers to automate tasks. For instance, you could configure it to react to a new row in Google Sheets or to notify you when a video finishes rendering. Always test your uploads by setting them to "Unlisted" to ensure the video, captions, and thumbnails are accurate.
Take inspiration from real-life success stories: In 2025, a tech reviewer named Sarah scaled her channel from 10,000 to 50,000 subscribers in just six months. She used FFmpeg for encoding, Your Automated Life for file transfers, and TubeBuddy to manage metadata – all while cutting her active workload to just 3 hours per week.
These steps lay the groundwork for a streamlined automation system that saves time and keeps your content quality intact.
How to Automate YouTube Content Step-by-Step
Automating Video Uploads and Publishing Schedules
At the heart of YouTube automation is a simple trigger-action workflow: when a new video file appears in a Google Drive folder or a new row is added to a Google Sheet, the system kicks into gear. AI processes the metadata, and the video is uploaded to YouTube.
To get started, set up a workflow in Your Automated Life to monitor a specific Google Drive folder for new video files. When a file is detected, the automation triggers an OpenAI node to generate a title (under 60 characters), a description (under 300 characters), and comma-separated tags based on the file name or a provided transcript. Use a Code node to clean up whitespace and ensure the character limits are met.
Next, connect a YouTube upload node using your OAuth credentials. During testing, set the upload’s privacy status to "Private" or "Unlisted" so you can review the video before it’s made public. Once the upload is complete, move the processed file from the "Ready" folder to a "Done" folder to avoid accidental re-uploads.
"Real growth on YouTube doesn’t just come from better content; it comes from eliminating repetitive publishing friction." – Dumpling AI
Since rendering videos can take time, it’s helpful to create two workflows: one for generating the video and another for uploading it once rendering is finished.
To avoid issues with YouTube’s API rate limits or spam detection, it’s a good idea to stagger your uploads throughout the day instead of publishing them all at once.
Adding Advanced Automation Features
Once your basic upload system is running smoothly, you can add more advanced features. For example, include a social media node to automatically post a teaser clip on platforms like Twitter, LinkedIn, or Facebook when a video goes live. Use Google Drive backup nodes to archive copies of your published videos for safekeeping.
If you’re working with long-form content, consider building a "clipping machine" that uses AI scene detection to create 5–20 short clips from a single video. These clips can be automatically posted to platforms like TikTok or Instagram Reels, giving you multiple pieces of content from one video. Tools like Revid.ai (starting at $39/month) or JSON2Video can help with this transformation.
You can also set up Slack or Gmail notifications to let you know when uploads are successful or if they fail. For better organization, integrate a Trello or Airtable node to log metadata, performance metrics, and publishing dates for each video.
Fixing Common Problems
Here are some common automation hiccups and how to address them:
- API quota limits: Keep an eye on your API usage to avoid exceeding YouTube’s daily quota. If you’re hitting limits, you can request a quota increase from Google or spread uploads out over 24 hours using scheduled triggers.
- Authentication failures: OAuth tokens can expire, causing authentication errors. Store your credentials securely in environment variables and update them every 90 days. Avoid hard-coding API keys directly into your automation tools.
- Metadata errors: If uploaded videos have incorrect metadata, double-check your AI prompts. Make sure you’re specifying character limits and formats clearly (e.g., "Generate a YouTube title under 60 characters"). Add validation filters to catch any missing or incorrect fields before uploading.
- Thumbnail and caption issues: Ensure your thumbnails are under 2 MB and verify captions for accuracy before publishing.
Improving and Scaling Your Automated Workflows
Tracking YouTube Analytics Automatically
Once your uploads are in place, it’s time to automate performance tracking. Schedule daily updates (e.g., 10:30 AM) to pull your channel stats using tools like Pabbly Connect, Coupler.io, or Zapier, then export the data to platforms like Google Sheets, BigQuery, or Excel. For frequent updates, Coupler.io can refresh analytics every 15 minutes, while BigQuery Data Transfer Service updates reports automatically every 24 hours.
Go beyond basic reports by using custom formulas in Google Sheets to calculate additional metrics like engagement rate (likes + comments + shares / views). To make this data more accessible, integrate it with visualization tools like Looker Studio, Power BI, or Tableau to create self-updating dashboards. These dashboards can track audience demographics, traffic sources, and subscription trends in real time.
To differentiate automated content performance, tag automated uploads with a unique prefix, such as "⚡Auto:", in YouTube Studio. This makes it easy to filter and compare automated videos against manually uploaded content. These insights will serve as the groundwork for refining your content strategy.
Using Data to Improve Your Content
With automated analytics in place, you can use the data to fine-tune your content strategy. Transform key insights into actionable tasks by connecting analytics to project management tools like Notion or Trello via Zapier. For instance, set up triggers to create tasks when videos reach specific milestones.
Conduct weekly reviews to analyze the top three and bottom three performing videos. Use these findings to tweak AI prompts, refine content themes, and update metadata templates. Since titles and descriptions often pull from spreadsheet cells, you can easily A/B test by updating a cell and triggering a re-render or metadata update. Before sending data to dashboards, filter for high-performing segments – like videos with over 10,000 views – and sort by engagement rates to identify patterns more quickly.
Managing Multiple YouTube Channels
As you streamline analytics and content optimization, scaling across multiple channels becomes essential. Use centralized dashboards and dedicated workspaces to manage multiple channels effectively. Tools like Vista Social, Social Champ, and Metricool allow you to oversee multiple YouTube Brand Accounts from a single interface, providing a unified view of all channel performance. Always opt for YouTube Brand Accounts instead of personal accounts to grant multiple managers access without sharing primary Google credentials.
When setting up automation workflows for multiple channels, create separate workspaces or organizations in tools like Zapier or Make.com to avoid data confusion or accidental cross-posting. Leverage branching logic, such as "Paths", to automatically route content based on format (e.g., Shorts vs. long-form) or aspect ratio. To prevent workflow disruptions, enable "Auto-Retries" in your no-code platforms or route failed tasks to a Slack channel for immediate manual review.
sbb-itb-4bfa3ba
Make.com FULL COURSE 2026: Beginner to Pro (Build & Sell AI Automations)
3 Automation Blueprints for 2026
Choose a strategy that boosts your productivity while leaving you time to focus on impactful work.
Blueprint 1: Short-Form Educational Videos
This approach is perfect for creators aiming to establish authority by sharing quick, educational content on platforms like YouTube Shorts, TikTok, and Instagram Reels. Start by creating a "Short Idea Grid" – a structured content bank built around 3–5 themes, such as "Common Mistakes", "Quick Tactics", or "Case Studies", each with 10 starter prompts. This eliminates the need for daily brainstorming and keeps ideas flowing.
Leverage tools like ChatGPT to draft concise scripts, then tweak them to reflect your personal style. For example, in 2025, Sarah, an educational creator, used Notion for planning, ChatGPT for scripting, and CapCut templates for editing Shorts. She also hired a virtual assistant for uploads and relied on Repurpose.io for multi-platform distribution. Her efforts paid off, growing her channel from 2,000 to 80,000 subscribers in just six months.
Batch production is essential. Recording or generating 10–15 videos in one session ensures a steady posting schedule. Tools with built-in voiceover features can streamline your workflow, while no-code platforms like Zapier or Make.com can automate uploads once a video is ready.
This method scales well. A 2025 study revealed that 83% of creators incorporate AI into their workflow, with over half using it specifically for video production to increase output. Regularly reviewing retention graphs helps identify which hooks and formats resonate, allowing you to refine your Idea Grid for even better results.
If you’re already creating long-form videos, the next blueprint can help you repurpose that content into engaging short clips.
Blueprint 2: Long Videos to Short Clips
This strategy is ideal for podcasters, interviewers, and tutorial creators who want to maximize the value of their long-form content. By turning extended videos into multiple short clips, you can distribute them across various platforms without creating entirely new content. To make this work, standardize your recording setup for better AI auto-reframing and scene detection.
Tools like Revid.ai and AI Video Cut simplify the process by transcribing long videos and identifying high-engagement moments. Auto-Mode workers can even monitor your YouTube channel or podcast feed, automatically generating draft clips from new uploads. This means up to 90% of the work – like extraction, assembly, and captioning – can be automated, leaving you to focus on final quality checks.
For assembly, tools like Shotstack or Fliki (integrated with Zapier) can programmatically combine clips, captions, and music. Distribution tools like Repurpose.io or PostEverywhere can handle auto-publishing across platforms like YouTube, TikTok, and Instagram. Consistent posting not only saves time but also helps build audience retention.
As Benjamin Semah of Shotstack puts it:
"The winning strategy today is not to ‘edit faster,’ but to stop editing manually altogether."
To optimize this system, start by manually approving AI-suggested clips for a few videos. This "teaches" the system what works best, allowing you to eventually transition to full automation. Store approved clips in a searchable database categorized by topic, hook type, and performance metrics for easy future use.
If you’re interested in running a faceless channel, the next blueprint provides a guide to automating content while adhering to YouTube’s quality standards.
Blueprint 3: Faceless Channel Automation
This blueprint is designed for creators running faceless channels, allowing them to automate content creation while meeting YouTube’s stringent quality standards. With YouTube’s 2025/2026 "Inauthentic Content" policy targeting low-value, mass-produced videos, the key is to integrate original commentary, research, or storytelling for compliance.
Start by selecting a niche. High-RPM niches for 2026 include Finance, AI Tools, SaaS, Tech Tutorials, and Health. Instead of generic content, focus on a specific concept like "History Explainers" or "AI Tool Reviews" to stand out and avoid being flagged as low-value. One motivational channel, for instance, earned over $155,000 in just two months by producing 8-minute videos with well-researched scripts of 1,500–1,600 words optimized for higher RPM.
Use AI tools for scripting, voiceovers, visuals, and rendering. Affordable AI solutions can handle most of the production, but human input is still necessary to meet YouTube’s quality guidelines.
| Feature | API-Based (Shotstack) | No-Code (Make.com + Revid.ai) |
|---|---|---|
| Best For | Developers/Agencies scaling to thousands of videos | Solo creators and small teams |
| Setup Complexity | Requires coding and technical knowledge | Visual drag-and-drop interface |
| Flexibility | Full control over every frame and element | Limited to tool templates and presets |
| Cost | $0.20–$0.30 per rendered minute | $39–$199/month for credits |
| Production Speed | Can render 100+ videos in one afternoon | 1–2 hours per video (including review) |
Distribution is streamlined using tools like Repurpose.io or Make.com for cross-posting to TikTok, Reels, and Shorts. However, the real differentiator for compliant faceless channels is the inclusion of unique human editorial input. By adding original research or storytelling, you create a "monetization moat" that protects against demonetization under YouTube’s "inauthentic content" rules.
As Revid.ai highlights:
"A system where your human time is reserved for high-leverage decisions, and everything repeatable is handled by software, SOPs, or other people."
Conclusion
YouTube automation in 2026 isn’t about sidelining your creativity – it’s about working smarter, not harder. By applying the strategies outlined here, you can transform the traditional production process into a system that automates up to 70% of your workflow. This shift allows you to dedicate more time to what truly matters: planning your content, connecting with your audience, and driving growth, while letting software handle the repetitive tasks. The goal is to integrate automation seamlessly without compromising the quality of your work.
Human oversight remains key to success. As Revid.ai puts it:
"A system where your human time is reserved for high-leverage decisions, and everything repeatable is handled by software, SOPs, or other people."
Whether you’re creating short-form educational videos, breaking down longer content into bite-sized clips, or running faceless channels, a hybrid approach is the winning formula. The most successful creators of 2026 leverage AI to boost speed and output, but they maintain quality through manual review. Automated workflows give these creators a clear edge, helping them consistently exceed performance benchmarks.
To put these strategies into action, consider setting aside one or two days each month to batch-produce raw content. After that, let automation take over tasks like scheduling and distribution. Platforms like Your Automated Life offer ready-to-use workflows and tools that streamline the technical setup, making it easier to scale your efforts. By embracing smart automation, you can not only increase your output but also surpass average monthly earnings, all while saving valuable time. With these workflows in place, you’ll stay ahead in the ever-changing digital landscape.
FAQs
How do I make sure my automated YouTube content meets quality standards?
To make sure your automated YouTube content meets the platform’s quality standards, stick to YouTube’s Community Guidelines. This means using only original or properly licensed footage, steering clear of misleading or prohibited content, and ensuring that your titles and thumbnails are accurate and relevant. If your content requires it, be upfront with clear disclosures, and always stay informed about updates to YouTube’s policies.
You can also use AI-powered tools to streamline video editing and improve your workflow. However, the real focus should be on producing high-quality, consistent uploads. Aim to create content that’s engaging and genuine, connecting with your audience while staying true to YouTube’s expectations for creativity and integrity.
How can I effectively manage API quota limits when automating YouTube uploads?
To handle API quota limits effectively, begin by monitoring your daily quota usage and distributing uploads evenly throughout the day to prevent surpassing limits. Wherever feasible, cache reusable data to cut down on redundant API calls and save quota. You can also batch API requests or control their frequency to stay within the allowed usage. If you run into quota-exceeded errors, use exponential back-off – a method where retries are spaced out progressively – to manage retries without overwhelming the system. Keep in mind that each video upload through the videos.insert method consumes 100 quota units, so plan your uploads wisely to make the most of your quota.
How can I use AI tools to automate my YouTube content creation process?
AI tools can make your YouTube content creation process smoother by automating tasks at every stage, saving you both time and effort. Here’s how you can put them to work:
- Brainstorming video ideas: Tools like ChatGPT, VidIQ, or TubeBuddy can help you discover trending topics, analyze keywords, and understand what your audience is looking for within your niche.
- Crafting scripts: Writing tools such as Notion AI or Writesonic can assist in creating scripts that sound natural and engaging, complete with attention-grabbing hooks, detailed content, and clear calls-to-action.
- Producing voice-overs: Platforms like Lovo or Murf can transform your scripts into professional audio, offering customizable voices to align with your channel’s vibe.
- Building videos: AI video generators like Pictory or Synthesia can piece together footage, images, and text based on your script, making the production process quicker and simpler.
- Enhancing thumbnails and SEO: Canva AI can help design visually appealing thumbnails, while VidIQ or TubeBuddy can optimize your titles, tags, and descriptions to boost your video’s visibility.
By automating these steps, you can dedicate more time to refining your strategy and creativity, all while producing polished videos efficiently. For practical workflows and step-by-step guidance, explore Your Automated Life to streamline your process even more.