
Creating blog post outlines from scratch can be overwhelming, but using AI simplifies the process. AI tools can generate structured outlines in seconds, helping you save time and focus on refining content. Here’s what you need to know:
- AI speeds up content creation: Users report completing tasks 40% faster while improving quality by 18%.
- Choose the right tool: Free options like ChatGPT are great for brainstorming, while paid tools like Jasper or Surfer SEO offer advanced features for SEO and branding.
- Provide detailed inputs: Specify your topic, keywords, audience, and tone for better results.
- Review and refine: Edit AI-generated outlines for logical flow, add personal insights, and align content with search intent.
- Focus on passive income AI workflows: Include actionable tips, tools, and monetization opportunities.
AI helps you move from staring at a blank page to creating structured, actionable content quickly. Follow these steps to streamline your workflow and produce high-quality blog posts that resonate with your audience.
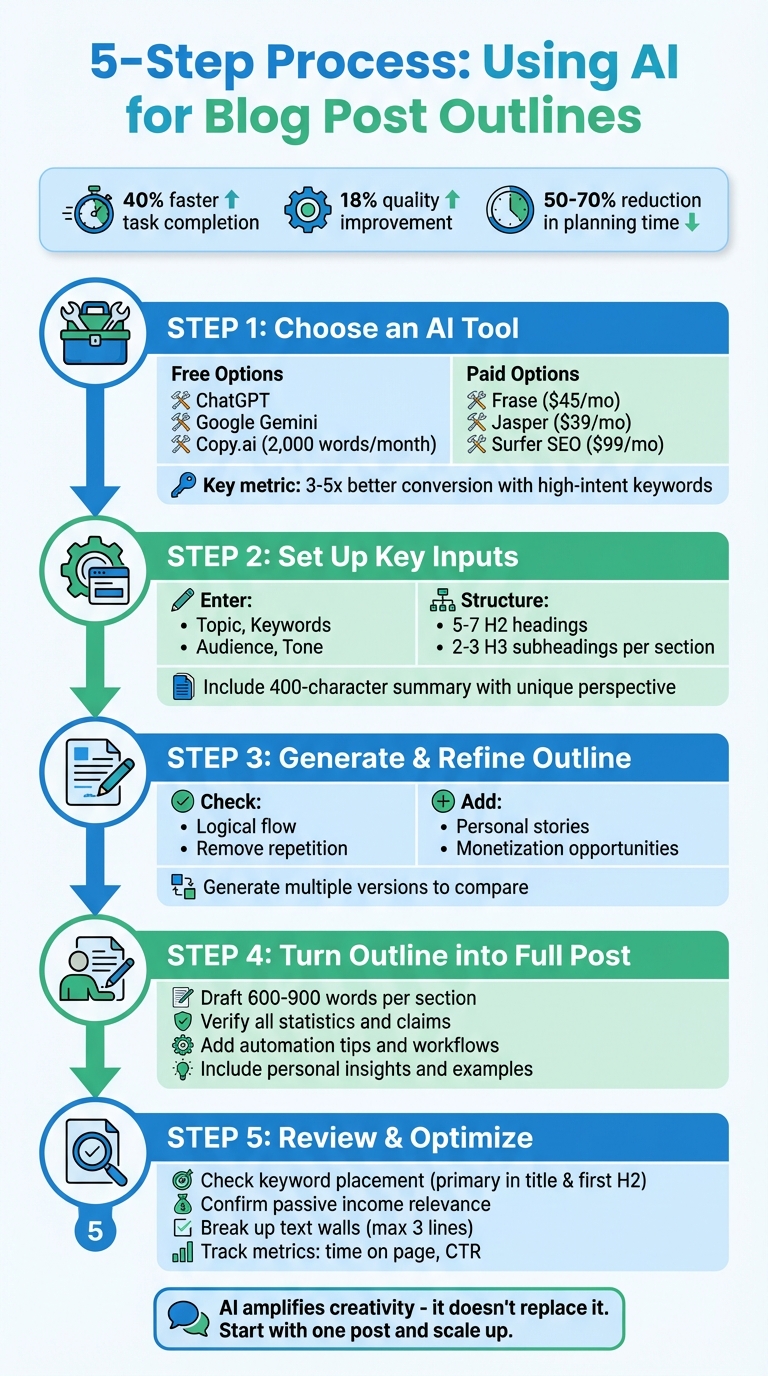
5-Step Process for Using AI to Create Blog Post Outlines
Step 1: Choose an AI Tool for Blog Outlines
Identify Your Goals
Before diving into tools, take a moment to define your goals. Are you creating a passive income blog targeting high-converting keywords like "best X for beginners" or "X alternative"? These types of keywords can convert 3–5 times better than generic topics like listicles.
Your objectives will guide your tool selection. For instance, if scalability is your priority, look for tools that can churn out multiple outline variations quickly. Here’s an example: a startup achieved $925 MRR in just 69 days by focusing on high-intent keywords like "X not working" and "how to do X for free." This strategy brought in 21,329 monthly visitors without relying on backlinks.
Consider your needs – do you require real-time research for fast-changing niches, or are you focusing on evergreen content with proven structures? If maintaining a consistent brand voice across numerous posts is critical, tools with custom AI personas could be a game-changer.
Once your objectives are clear, it’s time to explore AI tools to automate your workflow that fit your strategy.
AI Tools for Outlining
The right AI tool depends on your goals and the type of content you plan to create.
For beginners, ChatGPT and Google Gemini are excellent, cost-free options to start brainstorming. ChatGPT is great for creative ideation, while Gemini Pro specializes in crafting detailed, structured outlines for more comprehensive guides.
If your focus is SEO, tools like Frase and Surfer SEO are worth considering. Frase (starting at $45/month) analyzes top-ranking competitor content to suggest headings and subtopics. Meanwhile, Surfer SEO offers a free outline generator designed to align with search intent, with its full version priced at $99/month. On a tight budget? Copy.ai has a free tier that includes 2,000 words per month and user-friendly templates requiring no technical know-how.
"AI tools for blog outlines reduce planning time by 50–70%, letting you focus on writing." – Dustin W. Stout, Founder, Magai
For creators prioritizing a consistent brand voice, Jasper is a strong choice. Starting at $39/month, it provides over 50 templates and customizable brand voice options. It’s highly rated, with a 4.7/5 on G2 and 4.8/5 on Capterra. If you’re still exploring, try free tools like ChatGPT, Copy.ai’s free tier, or Surfer SEO’s free generator to get a feel for the outlining process before committing to a paid plan.
sbb-itb-4bfa3ba
Step 2: Set Up Your AI Tool with Key Inputs
Enter Your Blog Topic and Keywords
Start by entering your blog topic, a working title (no more than 200 characters), and relevant keywords. The more specific, the better. For instance, instead of a vague title like "making money online", go with something like "7 Passive Income Streams for Millennials in 2026." This level of detail ensures the AI understands your exact goal.
Include your primary keyword along with a few secondary ones. If your main focus is "passive income strategies", you could add related terms like "automated income" or "digital revenue streams." These keywords will guide the AI in shaping headings and subheadings, aligning your content with what people are actively searching for.
Define your target audience and their search intent clearly. For example, you might focus on millennial readers looking for how-to guides. Additionally, specify the tone, style, and content format (like a listicle or tutorial) to ensure the output matches your brand’s voice and style.
"When working with external writers, I try to give specific enough instructions that people know what we’re looking for at the start. That includes the specific headers we want them to include in the post, the number of stats to feature, images, KW instructions, and data sources." – Kaitlin Milliken, Senior Program Manager, HubSpot
Once you’ve nailed these inputs, you can move on to structuring your outline with these tailored settings.
Customize Outline Settings
Decide on the number of sections for your post. For a 1,500-word blog, aim for 5–7 main headings (H2s), each with 2–3 subheadings (H3s). This structure keeps your content scannable and engaging, which is key to holding the reader’s attention.
For blogs about passive income for parents, consider adding a 400-character summary that highlights your unique perspective. For example: "Share my experience of losing $1,000 on a failed side hustle, then transitioning to automated affiliate marketing." Including personal anecdotes like this makes your content stand out.
Take advantage of advanced features like custom AI personas (e.g., "Passive Income Expert") to fine-tune the tone and expertise level. You can also use JSON output for seamless integration with tools like Make.com, streamlining your workflow. Providing a few examples of successful outlines (2–3 samples) can also help the AI replicate your preferred structure and style.
Research shows that writers using tools like ChatGPT with a detailed setup completed tasks 40% faster and produced 18% better-quality results. The takeaway? The more specific and detailed your inputs – especially for topics like passive income – the less time you’ll spend editing later.
Step 3: Generate and Refine Your AI Outline
Review the Initial Outline
Click "generate" to create your first draft outline. Think of this as your starting point. Your role is to be the editor, while the AI serves as a tireless assistant – great at churning out ideas but without the nuanced understanding of your audience.
Start by checking the logical flow of the outline. Look for repetitive headings and combine them where necessary to keep things clear. A well-structured passive income blog post should naturally progress: begin with the basics, move into actionable steps, provide real-world examples, highlight common mistakes, and end with next steps. If the sections feel out of order, rearrange them now. As Deb Tennen, Managing Editor at Zapier, wisely notes:
"It’s much easier to move things around in an outline than at the draft stage".
This early structural work can save you hours of frustration later.
Next, perform a monetization check. Review the outline for opportunities to include affiliate links, product recommendations, or calls-to-action. If the AI missed sections like "Tools You’ll Need" or "Common Mistakes to Avoid", add them. These are perfect spots to weave in your passive income strategies.
Don’t stop with just one version. Generate a few additional outlines to compare different approaches. Often, this step uncovers ideas or structures you wouldn’t have thought of on your own.
Once the structure feels solid, it’s time to add your personal touch.
Add Custom Details
With the outline’s structure in place, focus on making it yours. Start by incorporating personal stories or unique insights. Have you made a costly error in your passive income journey? Share it. For instance, you could add a section like, "My $1,200 Mistake with the Wrong Affiliate Program (and What I Learned)." These kinds of details build credibility and trust, which are essential for meeting Google’s E-E-A-T (Experience, Expertise, Authoritativeness, Trustworthiness) standards.
If you have proprietary systems or checklists, now’s the time to include them. For example, if you’ve developed a 5-step process for evaluating passive income opportunities, make it a dedicated subsection. Similarly, if your outline touches on email automation, add a note to link to a detailed workflow you’ve already created.
Be on the lookout for generic AI phrases that can make your content feel bland. Words like "synergy" or "paradigm shift" don’t resonate with readers. Replace them with conversational, specific language that speaks directly to your audience.
Make sure your primary keywords are featured in H2 headings, while secondary keywords flow naturally into H3 subheadings. This approach not only helps search engines understand your content but also makes it easier for readers to skim and find what they’re looking for.
Finally, consider adding a "What People Get Wrong" section if it’s not already there. This is a great way to address common misconceptions while showcasing your expertise. Plus, it gives you another opportunity to offer solutions or link to helpful resources.
Step 4: Turn the Outline into a Full Blog Post
Write Content for Each Section
Start by drafting each section of your blog post individually. Use your AI tool to focus on one heading and its corresponding bullet points at a time. For better results, specify a target word count – something between 600 and 900 words often works well. This method gives you greater control over the tone, depth, and accuracy of your content compared to generating the entire post in one go.
Think of AI as your assistant, not your final editor. Once a section is generated, it’s essential to verify all details – like statistics, company names, and claims – against reputable sources. This step is critical for building trust with your audience and aligning with Google’s E-E-A-T standards (Experience, Expertise, Authoritativeness, and Trustworthiness). Make sure to vary sentence lengths to create a natural rhythm that keeps readers engaged.
Avoid overused buzzwords like "synergy" or clichés such as "in today’s digital world." Replace them with clear, straightforward language. A good tip? Read each section out loud. If a sentence feels awkward or clunky when spoken, it’s likely to trip up your readers too.
To make your content stand out, weave in personal insights. Share anecdotes, proprietary data, or hands-on experiences that AI tools can’t replicate. For instance, if you’ve tested multiple email automation tools, explain which one worked best for you and why. These real-world examples add a layer of authenticity that helps your content rise above the flood of generic AI-generated posts. Brooklin Nash from Beam Content emphasizes this approach:
"Spend twice as much time on your research and outline, and you’ll spend half as much time on your writing and editing."
Smooth transitions between sections are essential. Use concise sentences that connect the previous idea to the next, guiding readers seamlessly through your post.
Once your sections are complete, it’s time to enhance your blog with actionable automation techniques.
Add Automation Tips and Workflows
To maximize the value of your post, embed practical automation tips that readers can immediately apply. People interested in building automated income streams are often looking for step-by-step systems they can replicate. Share specific prompts you used to generate sections of your post, or include a downloadable checklist to help readers follow along.
For example, if your post covers email automation, go beyond just explaining the concept. Provide a ready-to-use workflow that readers can implement right away. Show them how to connect a Google Sheet to an email tool using a no-code platform, or include a screenshot of your setup to give them a clear picture of what success looks like. These actionable details empower readers to take immediate steps toward their goals.
If you’ve created custom workflows on platforms like Your Automated Life, now’s the time to highlight them. Link to detailed guides or reference specific automations you’ve built, such as syncing a finance dashboard or setting up a customer support bot. Not only does this add depth to your post, but it also encourages readers to explore your broader resources, keeping them engaged with your content ecosystem.
Step 5: Review and Optimize Your Blog Post
Check Keyword Placement and Flow
Make sure your primary keyword appears in the SEO title (under 70 characters) and the first H2 header. This helps search engines quickly grasp the focus of your content without making the phrasing feel forced or unnatural.
Take a moment to read your draft aloud. This simple step can help you catch awkward phrasing or overly long sentences that might disrupt the reader’s experience. Watch out for paragraphs that stretch beyond three lines – on mobile devices, these can turn into intimidating "walls of text." Breaking them into smaller chunks makes a big difference in readability. Swap out overly complex words for simpler alternatives (e.g., use "start" instead of "commence"). Also, check for overly robotic or generic phrases like "tapestry", "delve", or "unleash" and replace them with language that feels more natural and engaging.
Double-check all statistics and links to ensure accuracy. This not only protects your credibility but also encourages readers to trust your content and return for more.
Once you’ve streamlined your writing and placed your keywords thoughtfully, focus on ensuring every paragraph delivers actionable advice for building passive income.
Confirm Passive Income Relevance
With keyword placement and readability squared away, shift your attention to how well your content aligns with your passive income goals.
Go through each section and ask yourself: Does this help my reader build or improve a passive income system? Every paragraph should offer something actionable, whether it’s a detailed tip, a process they can replicate, or a tool recommendation. If a section feels more like filler or lacks practical value, rewrite or remove it. Your audience is looking for steps they can take right away – not just abstract ideas or theories.
This is also the time to ensure your content matches the right search intent. Informational keywords (like "how to create passive income") help build trust and educate readers, while transactional keywords (such as "best tools for passive income") can drive affiliate sales or conversions. When writing for passive income seekers, your content should clearly guide them toward actionable next steps.
Adam Enfroy, founder of AdamEnfroy.com, sums it up well:
"Leveraging AI correctly can transform your blog… but you must always think, ‘how can I provide the person reading my blog with the best answer to their questions?’"
Finally, don’t just publish and forget about your post. Use tools like Google Analytics to track key metrics such as time on page and click-through rates. These insights will help you understand what resonates most with your audience, so you can create more content that delivers real value.
How to Write a Blog Outline in 3 Minutes with ChatGPT – Free Blog Outline Generator
Conclusion
AI doesn’t take away your creativity – it enhances it. From selecting the right tools to refining outlines and crafting polished posts, AI can streamline your workflow and help you produce content optimized for passive income. In fact, this process can reduce your content planning time by 50-70%, allowing you to focus on what truly matters: your unique voice, accurate information, and actionable insights. This isn’t just about saving time; it’s about amplifying your individuality throughout your content.
As Liam Chen, AI Writing Strategist, explains:
"Using AI doesn’t replace your creativity. It amplifies it."
This is the sweet spot for building successful passive income blogs – delivering consistent, meaningful content that genuinely benefits your audience. Think of AI as your behind-the-scenes partner. It lays out the framework and suggests directions, but you’re still in the driver’s seat, making the decisions and adding the personal touches that make your content stand out. AI-generated outlines are just the beginning; your expertise is what brings them to life.
Start small: take one blog post idea, use an AI tool to create an outline, and turn that blank page into something structured and actionable. Then, scale up. By following the steps outlined above – from picking the right tools to optimizing your posts – you’ll empower your content strategy with AI-driven efficiency. The more you integrate AI into your process, the more time you’ll gain to expand your content efforts and grow your passive income streams.
For detailed guides and ready-to-use workflows, visit Your Automated Life (https://yourautomatedlife.com). Whether you’re just starting out or refining your approach, you’ll find resources to simplify your process and help you achieve faster, more effective results.
FAQs
What should I include in my AI prompt to get a better outline?
To get a more polished and structured AI-generated outline, make your prompt as specific as possible. Include details like the type of article you’re aiming for (e.g., listicle, op-ed), the main topic or theme, and the key points or challenges you want to address. For example, if you’re targeting an audience with specific concerns, mention their pain points, common objections, or frequently asked questions. The more precise your instructions, the better the AI can craft a focused and well-organized outline.
How do I make an AI outline match search intent and SEO?
To make an AI-generated outline work for search intent and SEO, clarity and relevance are key. Begin with a direct answer to the main question – this hooks readers immediately and satisfies search engines looking for concise responses. Use headings that reflect common search terms or queries, making the structure intuitive for both users and algorithms.
Break the content into focused sections that tackle specific sub-questions. This not only improves readability but also aligns with how people and AI systems process information. Including FAQs can address related queries, expanding the content’s utility and relevance. Wrap up sections with summaries or key points to reinforce the main ideas and make it easier for search engines to understand and rank your content.
How can I add monetization ideas without sounding salesy?
To weave monetization ideas into your content smoothly, prioritize offering value and catering to your audience’s interests. Leverage AI tools to tailor suggestions, like dynamic affiliate links or targeted offers, ensuring they come across as genuinely useful. Organizing posts with clear, question-driven headings can also help introduce monetization opportunities naturally. This approach keeps the focus on solving your readers’ challenges, fostering engagement without feeling overly promotional.